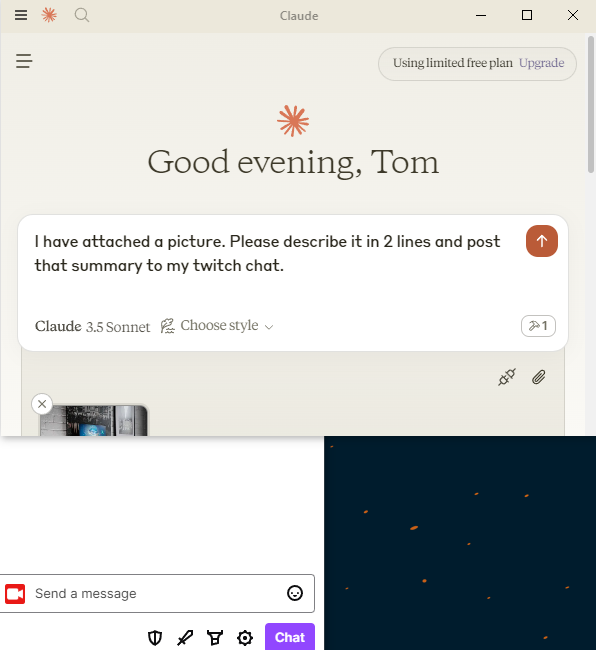
A few years ago, I built a Twitch Chat integration allowing me to post to Twitch from a Java application. Recently, I read this awesome blog post by Max Rydahl Andersen, where he explains how to create a MCP (Model Context Protocol) server using Quarkus.
Why not combine those two ideas into a brand-new project?! 🧪
In case you don’t know what Model Context Protocol is: it’s a up-and-coming standard which enables AI Models to interact with MCP servers. These servers can provide resources, reusable prompts and tools. This allows fairly isolated LLMs to go out into the world and get data or execute code through these servers.
So I decided to create my own MCP Server, hook it up to Claude (or any other MCP Client) and integrate it with Twitch Chat! In this blog post, I’ll explain the building blocks I used to build this project.
Final Result#

Code#
No talk, just code? Repository can be found here. 👇
A Model Context Protocol (MCP) server which allows MCP Clients (such as Claude) to connect to Twitch Chat.
Quarkus based MCP Server#
What I wanted to create was a tool which allows an MCP client to post to Twitch chat.
Since Max already provided a great example, I started by following his blog post, while adapting it to my own needs.
I created a Quarkus application with the mcp-server-stdio dependency, which will create a local STDIO variant MCP Server.
This means MCP Clients and our MCP Server need to run on the same machine.
While Quarkus also has an implementation for the remote variant using POST calls and Server-Sent Events (SSE), Claude doesn’t support that yet.
Next I created the following class which will provide the tool through MCP.
// TwitchMcp.java
public class TwitchMcp {
    @Inject
    TwitchClient client;

    @Tool(description = "Send message to the Twitch Chat")
    ToolResponse sendMessageToChat(@ToolArg(description = "The message") String message) {
        client.sendMessage(message);
        return ToolResponse.success(new TextContent("Successfully sent message: " + message));
    }
}
@Toolmakes Quarkus expose the annotated method as a tool. The description here needs to be good, because this is what theMCP Clientwill use to determine if it needs to use this tool.@ToolArgallows the MCP Client to pass parameters. In our case, the message which will be posted to Twitch Chat.
Which just leaves the creation of the TwitchClient.
Apache Camel 🐪 based TwitchClient#
When integrating anything in a Java application and you want to get it done quickly, Apache Camel is excellent! Not only does it have great Quarkus Integration, it also has a broad range of components which allow you to connect to virtually anything.
Nearly five years ago, as I discussed in this blog post, I discovered that Twitch uses IRC, for which Apache Camel provides a dedicated component!
For those of you who might not know this…IRC, or Internet Relay Chat, is an Application Layer Protocol built on TCP. It’s a fairly simple text based protocol which has been around for 30 years now and is still used today.
I added the Camel Quarkus dependencies and created a class to build my Camel Route. I used the Endpoint URI syntax, which allows me to use a simple String to reference to components.
// CamelRoute.java
@ApplicationScoped
public class CamelRoute extends RouteBuilder {
  // Configuration Properties used later.
  @ConfigProperty(name = "twitch.channel")
  String channel;
  @ConfigProperty(name = "twitch.auth")
  String authToken;

  @Override
  public void configure() throws Exception {
    String twitchIrcUrl = "irc:%s@irc.chat.twitch.tv:6667?nickname=%s&password=oauth:%s&channels=#%s"
    .formatted(channel, channel, authToken, channel);

       // sender
       from("direct:sendToIrc")
               .routeId("sendMessageToTwitch")
               .setHeader("irc.sendTo", constant("#"+channel))
               .setBody(simple("${body}"))
               .to(twitchIrcUrl);

  }
}
The direct component allows us to trigger the route from code. This is where the TwitchClient comes in.
// TwitchClient.java
@ApplicationScoped
public class TwitchClient {

    @Inject
    ProducerTemplate producerTemplate; // Provided by CDI

    public void sendMessage(String message) {
        producerTemplate.sendBody("direct:sendToIrc", message);
    }
}
Run the Uber-Jar with JBang#
Most MCP Clients will start the configured MCP Servers on startup (at least if it’s a local STIO variant, which is what we have built). To make it simple to run the MCP Server, just like Max did in his blog post:
- I created an uber-jar, so a single JAR file will be created which can be executed. (config:
quarkus.package.jar.type=uber-jar) - Installed the uber-jar in my local Maven Repository by executing
mvn install. - Used JBang to execute the JAR file without worrying where Java is installed.
With these elements in place, I can configure Claude Desktop (MCP Client) to call JBang and pass in the correct parameters to start the MCP Server.
// claude_desktop_config.json
// Configurable through File > Settings > Developer > Edit Config
{
"mcpServers": {
    "twitch-mcp-tomcools": {
        "command": "jbang",
        "args":
          [
              "--quiet",
              "-Dtwitch.channel=YOUR_CHANNEL_NAME",
              "-Dtwitch.auth=YOUR_API_KEY",
              "be.tomcools:twitch-mcp:1.0.0-SNAPSHOT:runner"
          ]
        }
    }
}
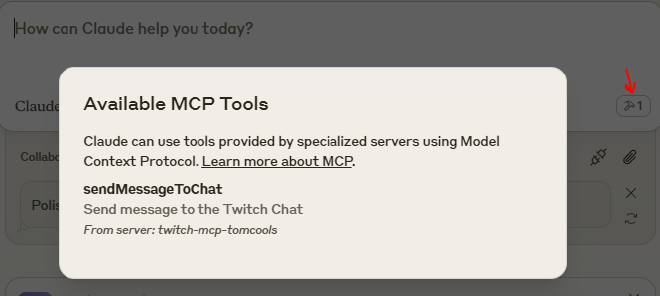
This will start our Quarkus MCP Server using JBang. Restarting Claude Desktop should now show the tool in your chat.

Tadaa! 🎉 We can now use Claude to post messages to our Twitch chat!

Conclusion#
I’m impressed how easy it was to create an MCP Server and get it running with Quarkus and JBang. My head is just buzzing with ideas on how to use these technologies. Looking forward to experiment more!
Further reading: